Friday, December 22, 2017

59 and four quarters

One day I was wearing my favorite apron, when I realized that if I didn't make something else out of this cute fabric, my world would be lost.


so I went on a hunt . . .


And found a couple jelly rolls.  


I had a scrappy log cabin in mind . . .


I'm a little too OCD for true scrappiness . . .  I have to have SOME order. . .


I wanted some chunky lines 


This is where this quilt got bottle-necked for a few months . . . on the dining room table, waiting for the chunky lines.  


Someone in our house just turned 59 and four quarters !! (can't say that other number :)


 That is "T-bone" in the back ground, he's probably in the freezer by now :)


quilt stats:
76 x 84 (washed) - made to fit a twin bed
top - log cabin with 2 1/2 inch strips
blocks - 10 "
fabric - "road 15" by sweetwater, and a few others thrown in
back - scraps for the blocks and "ink" by Zen Chic (gray and black)
quilting - fmq random spirals
chunky stitching - No. 8 in white
batting is 80/20 comfort by Winline


Linked:
by crazy mom quilts


Sunday, December 10, 2017

African Quilt

A client brought me this beautiful quilt top earlier this year that she had made from fabrics which she had purchased while living in Africa.   She made this quilt top for a memory of their time there.  

She wanted to have the option of being able to wash it.  I was VERY concerned about the colors running since she had not pre-washed her fabrics.  So I asked her to take it home and gave her some specific washing instructions (cold water,  delicate/hand wash cycle to minimize fraying, with a box or two of those Clorox Color Catchers, and to repeat the process until the rinse water came out fairly clear)

It sat on my dining room table for a few weeks while I came up with a quilting design.

The focal fabric was this gorgeous elephant in the middle.  It's one of those waxed prints from Africa made like a batik on a soft canvas.   I free motion quilted around all the parts of the elephant, especially those ridges on his trunk, and buried the threads.  

I knew I wanted to incorporate a diagonal tile design to repeat the lines of the log cabin blocks.


My client asked that I incorporate this African design into the quilt.  So I sized it to fit in 4 corners.  
I copied it onto that special thin paper used for quilting, pinned it down and very slowly quilted over the design, burying the threads.

I added an echo around it, separating it from the tile quilting.  I stitched over the design several times to make it stand out.


My favorite fabric on her quilt (besides the elephant) was this border batik.  I love the contrast of the bright yellows and red/orange against the black (it was also used for the backing) I knew that free motion quilting around the fish and curved lines would add a nice contrast to the rest of the quilting and would make these fish pop.


I was very happy with how it turned out.  


Tuesday, October 10, 2017

lone star quilts for twins

When you have twin grandbabies born in the "lone star state", you just gotta make them a "lone star" baby quilt, right?


I used this tutorial for the quilt top.


The girl quilt is made from the fabric line "Wonderland" by Rifle paper company, still available on etsy sites.


The boy quilt fabric is from my stash.  It has an organic spiral in the star,  then continues to the edges with organic straight lines, giving it a more masculine look. 


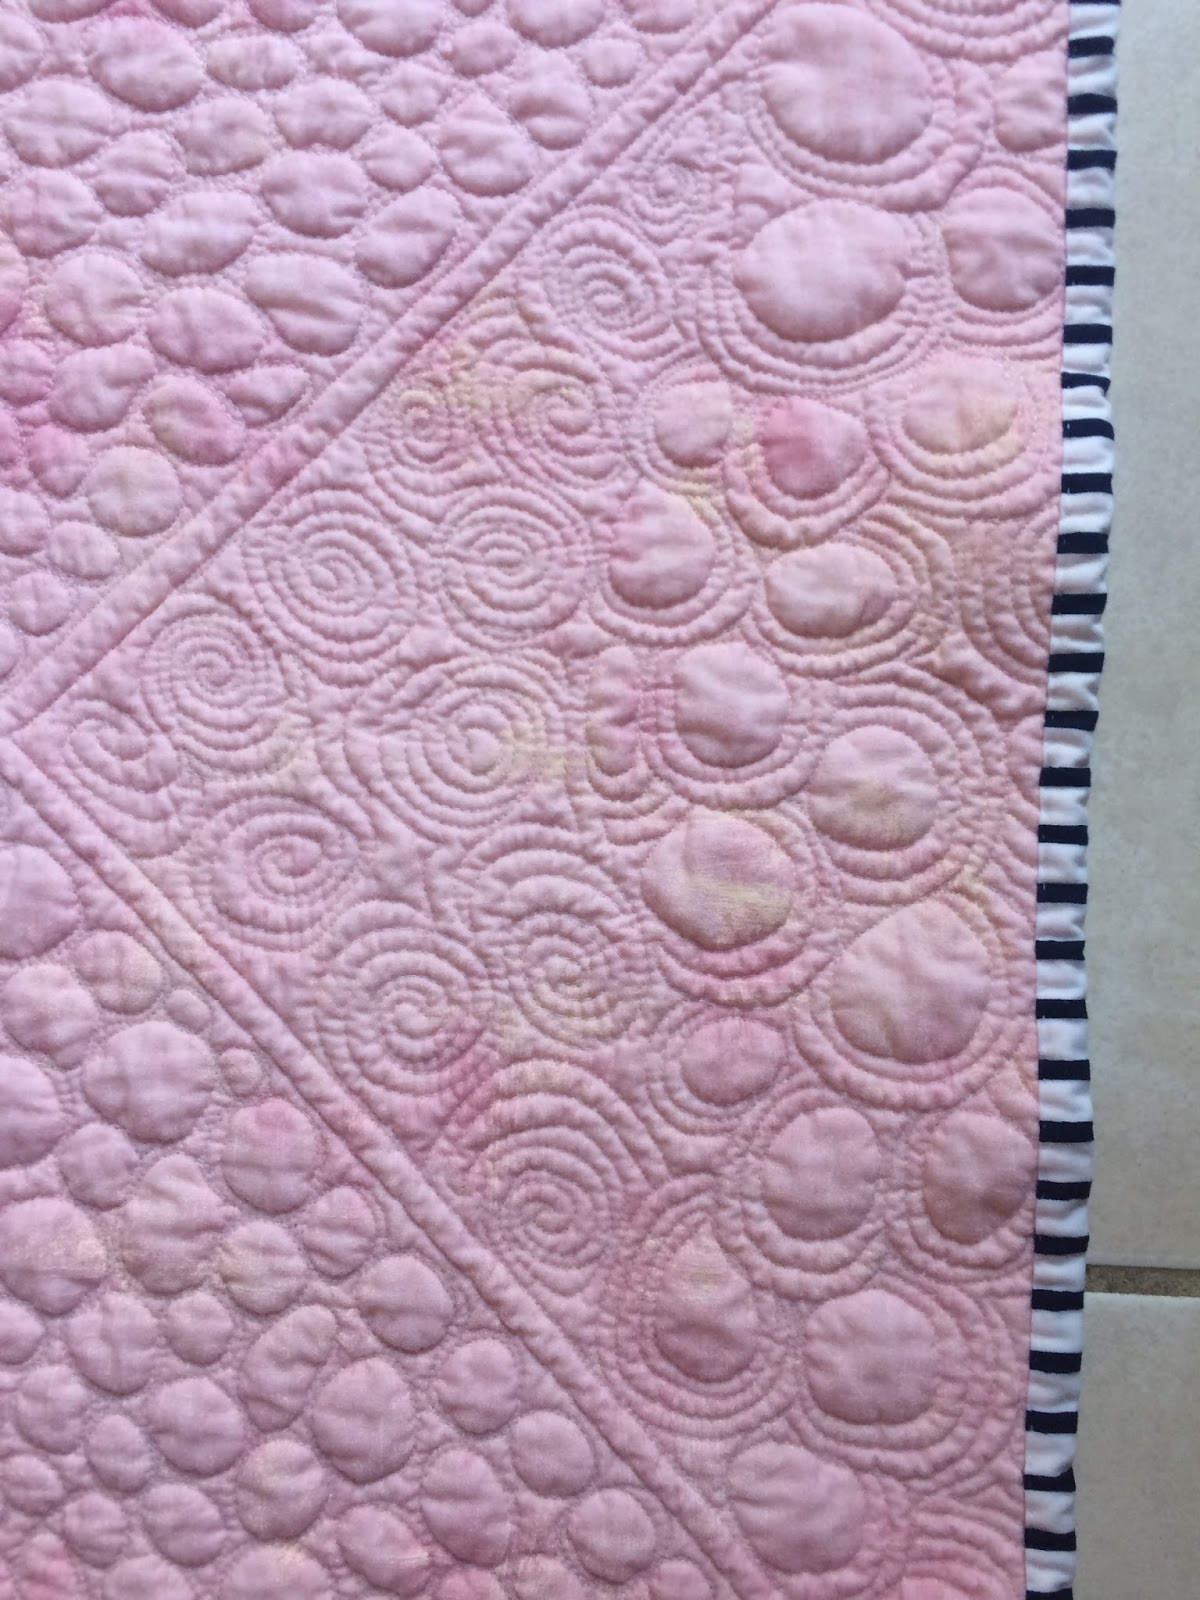
With all the crazy, confetti free motion quilting I've seen lately,  I wanted to do something different with "her" quilt.  I took a class on Craftsy from Christine Cameli on "wild quilting".  

 I wanted the outer edges to have open spirals, then randomly graduate to closed spirals before I got to the star.  Drawing a line on the fabric with a disappearing pen before I started, helped me to know where to stop the opened spirals and start the closed spirals.  I'm learning the hard way that marking up your quilt top with your quilting ideas helps you remember them since once you start quilting, you are so focused on what is right in front of you and not the whole design.


I love how the grunge pink on the back ground really helps your quilting stand out.  I think that's my new "go to" backing fabric when I put more effort into the quilting of a quilt.
I wanted the star to be well defined, so I quilted a double line around it's edge.


I have noticed that some of my quilts that are past 5 years old, have lost their fluffiness and are flat, as in it's hard to tell if they even have batting in them.  I have discovered that if I wash them, and put them in dryer for 8-10 min on medium, that the fluff comes back.  
But I also want to test these 2 quilts, as they will probably be used about the same amount.  On the girl quilt, I used 2 layers of batting, compared to the boy quilt which only has 1 layer.  I will be interested to see in time what the difference is.


The girl quilt ended up measuring smaller in the end because the quilting was more dense.


linked:

finish it up Friday

whoop whoop

Tuesday, July 25, 2017

save your selvages

Has anybody else been saving their selvages?  
see tutorial at end of post


I don't know where this picture came from.  Possibly QuiltCon.


Riel of The Q and the U even has a book out on Amazon titled "Modern Selvage Quilting"

Carolinasquirrell has some great selvage quilts in her etsy shop, including this one called Vintage Spools.


At quilt market last year, I stood in line next to a group of ladies who had these cute pouches hanging around their necks.

They had a plastic sleeve for their exhibitor pass.


 A front pocket for a pen and cards.

Then, the middle opening for wallet, phone etc.   It was so convenient, and every year I say that I'm going to make one.  Cuz, you know . . . you've got to do something with all those selvages you've been collecting.

Melinda on Selvage Blog has some fun ideas including this one:


A Funky Chicken pincushion is definitely on my sewing bucket list:


"baskets for moo" has done a great job with a tutorial here.

Don't forget the "fancy fur" for "comb attitude".