This is called the "stack and sew" method. I learned about it at a retreat last year. This method has added years on to my life! Basically after you've placed your squares on your design wall (or floor), it's a way of picking up the squares in a certain order into 1 big stack, then sitting down at your machine and chain-piecing the stack together.
Read through all directions before starting, and you will see just how easy it is.
I'm using JenKingwell's new line called Gardenvale.
On the design wall, I have 4 inch squares, placed in a drunkard's path design, 10 squares across, 8 squares down.
close-up:
The first step is to place a pin diagonally in the top left hand square. That will be column 1. Keep that pin there, it will help you keep track of where you are.
Starting at the top, you're going to take each square in your second column and lay it on top of the square to the left (the first column), right sides together
Place a pin through those first 2 squares on the top right side, indicating your sewing direction.
Double check to make sure you have your first square (marked with your diagonal pin) on the bottom side of those first 2 squares.
Now work down the second column, and place each square on to the square to it's left in the first column, all the way down.
The first and second column are ready.
Now go back up to the top of that column and pick up the first pair of squares. It's the pair that has the pin on the right side showing you the direction you're going to sew in a few minutes.
Lay that pair on top of the pair below it and move all the way down, placing your stack on top of the next pair of squares.
Lay this stack on the floor, just below where you just picked them all up, taking care to lay them so that the pin is still on the top right hand side.
Third column. From here on out, you will only be picking up 1 square at a time. Pick up the top square.
Lay it on top of the next square below it, right sides of fabric facing up.
Work all the way down the column
until you've come to the last square.
Now set that "third column" stack down on the floor next to the stack of the first 2 columns.
Continue collecting the columns as previously explained, laying the column on the floor until you have collected all the columns. Your design wall should be cleared off (that's my favorite color toe-nail polish)
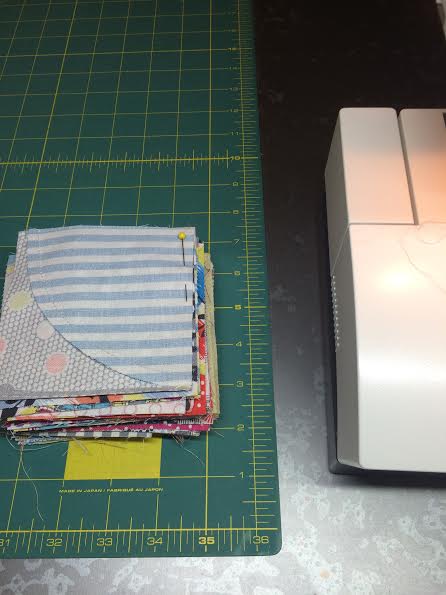
Now you're going to pick up the first stack you laid down on the far left. It should have that pin on the right hand side.
Place that first stack on top of the next one
and so on, moving down the line, being careful to keep the squares in the same direction.
Keep picking up stacks till you come to the end. You should now have 1 big stack with all your squares.
Now move to your sewing area. You're going to pick up the first 2 squares. They are the ones with a pin on the right side showing you the direction to sew, and the one below it, should have the diagonal pin, indicating that it's your top left square. Sew those 2 squares together, along the right side, with a 1/4" seam allowance.
Now you're going to pick up the next 2 squares and chain piece them to the first set. DO NOT CUT THE THREADS, DO NOT PRESS AT THIS POINT. The 2 squares you're sewing together should be right sides together. Continue chain piecing down your stack until . . .
until you have a square that is showing the right side up. Don't let it scare you. You didn't do anything wrong. It's the top of the 3rd column.
Here I have opened up the first 2 squares that I sewed together. The left one has the diagonal pin. Now you're going to start sewing your third column onto the second column, chain piecing all the way down until you come to the end of the column.
REMEMBER, DO NOT CUT ANY STRINGS, DO NOT PRESS AT THIS POINT. Leave at least 1/2 inch of thread while chain-piecing.
Continue chain-piecing
Here I have finished 4 columns. Continue . . .
until you have finished the stack. Now you have lots of rows, connected by threads. Time to press!!!
Move to your ironing board. Alternate pressing to the right and to the left.
No strings have been cut.
All rows are pressed and ready to be sewn together.
Sew the first two rows together. You may use pins if you want (bah! ) I like to press after every row. It makes me feel good to see the finished product beginning to show.
Finished product. That took me a couple hours because I'm slow, but it used to take me a day, as i carefully picked up 1 row at a time and carried it to my machine. Keep these instructions handy, you may need a quick refresher each time you need to use this method.
Just in case you're wondering, this drunkard's path has intentional un-matched corners, or it wouldn't be a true drunkard's path, right? :)
but next time I WILL purchase a ruler, and will not use the lid to my crock pot. Then my circles won't look like rounded diamonds.
Thanks to my crazy retreat friends who taught me this method. I asked them to leave me a comment, but most of them are technically challenged :)
linked:


Thank you so much for sharing this method. It makes such good sense and I can see how well it works. Your instructions and pictures make it very clear.
ReplyDeleteAnd your drunkards path looks great, too.
Great tutorial. I have used this method twice, and will definitely be doing it again. :)
ReplyDeleteGreat tutorial and thank you so much. I have a few quilt projects in mind that this would be great for
ReplyDeleteGreat tutorial and thank you so much. I have a few quilt projects in mind that this would be great for
ReplyDeleteBeen doing this for years and saves a lot of time. The only difference is I do mine across the quilt not down. Great tutorial.
ReplyDeleteThanks, that was like a mini workshop. I needed that, its always so nice to see this process and good choice on Drunkard's Path. I'm drooling over Gardenvale....
ReplyDeleteThis method really does help to keep everything in order. Great job on the tute! Whoop whoop - This is a beautiful quilt!
ReplyDeleteGreat tutorial! I amaze myself with how I can get blocks out of order ;-/ This technique has helped though. I love what you did with your Gardenvale squares. It's lovely!
ReplyDeleteGreat explanation - I keep getting blocks turned around when I go to sew them so will definitely be trying this!
ReplyDeletethanks so much for this tutorial. I have been chain piecing in rows from left to right but I'm going to give this a try next time. I think it will be faster !
ReplyDeleteColleen @ piecemakerquilts.wordpress.com
my seam ripper and I have fixed many an error because I get my pieces mixed up, I will have to try this way from now on!
ReplyDeleteThat is so completely clever! I usually make stacks and label them with post its but I'm going to try this next time because the quilt in progress will essentially be 11 x 18 squares and that looks like it would be so much easier (and quicker is always good when you have limited sewing time!)
ReplyDeleteone I need to learn to sew a curve, second I need to use a machine...because I love this scrappy top!
ReplyDeleteWow, Great tutorial. I will definately try.
ReplyDeleteWow, Great tutorial. I will definately try.
ReplyDeleteThat does seem to take the frustration out of keeping the blocks in the proper order! I had chain-pieced rows, but never an entire quilt top like this. Looks like fun and speed together at one time!
ReplyDeleteThis looks really smart... perhaps a little too smart for me. I always have to take photos of my quilt wall before I start on anything as to not mess up the order, and end up needing to reference my pics more often than I would like.
ReplyDeleteI really like the Drunkard's path blocks... great WIP!
Greetings from Germany!
This certainly looks one to try - although I am sure it will make more sense with the pictures and instructions right next to me whilst I am doing it. It would be lovely to speed up that whole process of piecing the quilt!
ReplyDeleteI sort-of do it this way except I keep the stacks of each row off-set from each other. Love it! Thanks!
ReplyDeleteI've tried this method twice now and it is SO AWESOME! I especially love how my rows stay connected to each other in that last step. Thanks so much for sharing!!!
ReplyDeleteThank you so much for your tutorial. I often muddle them up when working and thanks to your perfect pictures I will now manage to do it correctly. thanks again!
ReplyDelete