Friday, July 31, 2015

Christmas in July & giveaway

Today's the last day to finish my Christmas gifts in July.  Table runners is the ticket this year with the new Christmas line out by Sweetwater, "Holly's Tree Farm"
So. Cute.


Look how darling these fabrics are:


I started playing with all my favorite designs like this one, values, lining up the darks and the lights.


Oh, and since we celebrate Christmas in July and it's my birthday in the later part of July, I decided that these items from my LQS were a justified purchase (in case the hubby needs a suggestion, you know . . . I'm helping him out.)

OMW!!  Matilda's Cutting Mat is absolutely amazing.  It turns like a dream, and there aren't any corners to get in your way.  It came in so handy as I was making those hst.


 If you're thinking about one, it's got my vote!  Definitely a good investment.  You can see a youtube video and read about them here


Next, "Bloc Loc rulers".  Now, I'm not one to have lots of gadgets in the kitchen, I pride myself on not having a tool if I have something else that can do the same thing, just not as fancy.  But I've decided on a different policy in the sewing room.  This ruler is definitely a must.  And with Matilda's rotary cutter . . . well lets just say that I now enjoy making HSTs.
Aren't those cars/trucks cute?  


Next topic.

Last month, I used the "stack and sew" method and made this quilt using "gardenvale" by Jenkingwell.  You can read about it here.


I have a left-over charm pack that can't be returned and would love to give away.
To enter the giveaway, leave a comment and tell me how you follow this blog.
GIVEAWAY CLOSED. - Congratulations, Vicki S.  I've sent you an email.


linked:
crazy mom quilts

Wednesday, July 22, 2015

wip- bugs plus quilt

Another plus quilt.  This time, I'm trying the "rectangle in the middle" method.  I'm already seeing a disadvantage to using this method, I can't use my "stack and sew" method, posted back here which would save me eons of years as I sew it together.  I'll have to sew row by row . . . boooorrring!  


I think I'm looking for a more muted look, maybe more green too.


 These are my favorites, and didn't make it into the circle photo shoot.  These were from Hawthorne fabrics online.


I think I'll bind in that dark poka-dot gray on the bottom left


 Have you seen the "wimpy kid" line out at  your local quilt shop?  so. cute.


The inspiration came from this quilt by quiltstory on IG.


Here are the notes I'm working off of:
twin bed size (for my sewing room)
squares are 4 inches.
1 rectangle and 2 squares = 1 plus
18 squares wide (if the rectangles were 3 squares)
24 squares long

pillow sham:
9 squares x 6 squares

cut FQ into 4-4inch strips across longer length of fat quarter.  cut 1 4x11, cut 2-4x4.
need 21 FQ

love the dark gray binding

for the love of George (ha ha, love the name of her blog)  has a nice tutorial.  I've made lots of plus quilts, but always cut all squares, never used a rectangle for the middle piece.  This diagram helped with the layout.


gray plaid sheets underneath.  matching pillow case (go back to pine needle village and get more from the collection)


linking up:

freshly pieced


Friday, July 17, 2015

my small world -top complete


When I first saw this beautiful quilt made by the amazing JenKingwell, "my small world", splashed all over IG after Spring market, I HAD to have one!


I didn't realize there was a pattern.  It is printed in the QuiltMania Spring issue 2015.  Read more about that here.

I just thought she'd put all her "left-overs" into a quilt.  
So, I quickly took off what I had on my design wall, and pulled out all my left-overs and scraps.  


I wanted there to be the same over-all look, so I had to sort my left-overs and scraps into 2 piles, traditional and the whimsical "candy-colored".  I'm more comfortable sewing with the later of the two.


Within an hour or so, my clean, organized sewing room looked like this:
(and unfortunately, stayed like this for weeks during the designing process)


I started by taking a few pieces and putting them up on the design wall, until I liked what I saw.  Then I'd work with a few more pieces.  It was like putting a puzzle together.  Arranging and re-arranging until I liked what I saw.  (some of these bad pictures were taken at night)


Columns started to form as I put left-over blocks together and I realized that I was looking at a city skyline.  Notice the contrasting colors, shapes and sizes next to each other, balancing with different values of color.


I really wanted to use all the left-overs and scraps that I could so below the columns, I started putting odds and ends together.


This was such a liberating quilt to make because there was no pattern, not even an "end in mind" for a while, just raw designing, creating.


 I knew that I wanted a "portrait" shaped quilt where as JenKingwell's quilt is a landscape version, to be hung.  So, I took off this strip along the right . . . plus it just didn't seem to look right.


After I was 75% settled, it was time to start on the sky.  I started with a small pieced sun (this was the only part that wasn't already pieced, but I did use scraps)


I realized that I'd have to add sky to all my columns and make them the same height before sewing the columns together.


Sections started coming together.


I worked, finishing pieces and sewing them together until the sections became larger and larger.  Pretty soon, there were just 5 or 6 sections!  It was so exciting to finally see it coming together.


"My" small world looks different from JenKingwell's.  I love to quilt with linear lines, and larger shapes.  So, that's what my world looks like.  I do like that Jen's has lots more curves than mine, which tells me I need to broaden my horizons, and step out of my comfort zone some.

Finished:


What would "your" little world look like if you put all your "left-over" blocks together?  What tends to you prefer?  What designs speak to you?

If you want to see the quilts where any of these blocks came from, just click on "finished quilts" at the top of my blog and you will quickly be able to find the matching quilt.


linked:


Wednesday, July 8, 2015

Stack and Sew method

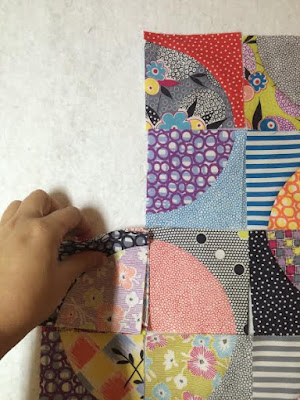
This is called the "stack and sew" method.  I learned about it at a retreat last year.  This method has added years on to my life!  Basically after you've placed your squares on your design wall (or floor), it's a way of picking up the squares in a certain order into 1 big stack, then sitting down at your machine and chain-piecing the stack together.  

Read through all directions before starting, and you will see just how easy it is. 

I'm using JenKingwell's new line called Gardenvale. 


  On the design wall, I have 4 inch squares, placed in a drunkard's path design, 10 squares across,  8 squares down.


close-up:


 The first step is to place a pin diagonally in the top left hand square.  That will be column 1.  Keep that pin there, it will help you keep track of where you are.


 Starting at the top, you're going to take each square in your second column and lay it on top of the square to the left (the first column), right sides together


Place a pin through those first 2 squares on the top right side, indicating your sewing direction.


Double check to make sure you have your first square (marked with your diagonal pin) on the bottom side of those first 2 squares.


Now work down the second column, and place each square on to the square to it's left in the first column, all the way down.


 The first and second column are ready.


 Now go back up to the top of that column and pick up the first pair of squares.  It's the pair that has the pin on the right side showing you the direction you're going to sew in a few minutes.


 Lay that pair on top of the pair below it and move all the way down, placing your stack on top of the next pair of squares.


 Lay this stack on the floor, just below where you just picked them all up, taking care to lay them so that the pin is still on the top right hand side.


Third column.  From here on out, you will only be picking up 1 square at a time.  Pick up the top square.


 Lay it on top of the next square below it, right sides of fabric facing up.


 Work all the way down the column


 until you've come to the last square.


 Now set that "third column" stack down on the floor next to the stack of the first 2 columns.


Continue collecting the columns as previously explained, laying the column on the floor until you have collected all the columns.  Your design wall should be cleared off (that's my favorite color toe-nail polish)


Now you're going to pick up the first stack you laid down on the far left.  It should have that pin on the right hand side.


 Place that first stack on top of the next one


 and so on, moving down the line, being careful to keep the squares in the same direction.


 Keep picking up stacks till you come to the end.  You should now have 1 big stack with all your squares.


 Now move to your sewing area.  You're going to pick up the first 2 squares.  They are the ones with a pin on the right side showing you the direction to sew, and the one below it, should have the diagonal pin, indicating that it's your top left square.  Sew those 2 squares together, along the right side, with a 1/4" seam allowance.


 Now you're going to pick up the next 2 squares and chain piece them to the first set.  DO NOT CUT THE THREADS, DO NOT PRESS AT THIS POINT.  The 2 squares you're sewing together should be right sides together.  Continue chain piecing down your stack until . . .


 until you have a square that is showing the right side up.  Don't let it scare you.  You didn't do anything wrong.  It's the top of the 3rd column.


 Here I have opened up the first 2 squares that I sewed together.  The left one has the diagonal pin.  Now you're going to start sewing your third column onto the second column, chain piecing all the way down until you come to the end of the column.


 REMEMBER, DO NOT CUT ANY STRINGS, DO NOT PRESS AT THIS POINT.   Leave at least 1/2 inch of thread while chain-piecing.


Continue chain-piecing 


 Here I have finished 4 columns.  Continue . . .


 until you have finished the stack.  Now you have lots of rows, connected by threads.  Time to press!!!


 Move to your ironing board.   Alternate pressing to the right and to the left.


 No strings have been cut.


 All rows are pressed and ready to be sewn together.


 Sew the first two rows together.  You may use pins if you want (bah! )  I like to press after every row.  It makes me feel good to see the finished product beginning to show.


Finished product.  That took me a couple hours because I'm slow, but it used to take me a day, as i carefully picked up 1 row at a time and carried it to my machine.  Keep these instructions handy, you may need a quick refresher each time you need to use this method.  

Just in case you're wondering, this drunkard's path has intentional un-matched corners, or it wouldn't be a true drunkard's path, right?  :)  
but next time I WILL purchase a ruler, and will not use the lid to my crock pot.  Then my circles won't look like rounded diamonds.


Thanks to my crazy retreat friends who taught me this method.   I asked them to leave me a comment, but most of them are technically challenged :)


linked: