Tuesday, November 10, 2015

draw string bags

These bags are fun and easy to make.  


Inspiration for this tutorial comes from Empty Bobbin.   She uses them for party treat bags for kids and grandkids.  I can think of a million ways to use them.  It's a great tutorial, I just needed to record a few extra steps for myself for when I make these bags again.  You're welcome to join along.


Supplies you will need:

-  2 fat quarters (coordinating, using the light one for the inside of the bag, making it easier to see inside)


-  1 yard of 3/16" cording (can be found at big box store)

- compass

- disappearing ink marker

** all seams are 1/4 inch


INSTRUCTIONS:


Cut one 19" x 8.5" rectangle from each of the two fat quarters. 


Turn rectangles to the wrong side.  On one end of the short side of the rectangle, make marks 1" and 2" down from the top.  You will need these to keep a 1" opening for the cording.  


On the LINING only, make an additional set of marks at 4" and 7".  (This will be used to turn the bag right side out after assembly.)


Set your compass so that it will result in a 6" diameter circle. 


Draw the circle on the lighter fabric, then cut them both out together.


This is where I added an extra step. 

To add support to the bottom of the bag, cut a circle of batting (or interfacing) the same size as the circle.


Fold each rectangle right sides together and sew along the short sides.  Be sure to leave the 1" opening on the darker (outer) fabric, and the 1" and 3" openings on the lining fabric.


Iron open the seams, making a good crease (you will be sewing that 3 inch hole closed and a crisp crease will be nice).  You should have 2 tubes of fabric.


Pin the circles to the bottom of the tube, away from the 1" opening, double check that last step for both tubes.  (I'm not a pinner, but I'd highly recommend pinning for this part, you won't have puckers if you use pins)  

Sew the circle to the tube.  Repeat for the lining, including the batting which will face the wrong side of the fabric.

Stitch each piece.  Clip all the way around to relieve tension.  Careful not to clip your stitches!


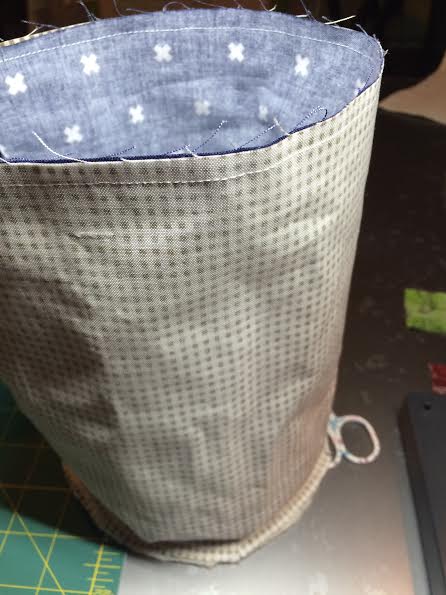
Place darker tube inside lighter tube, right sides together.  Match up seams, making sure that the 1 inch holes line up.  Sew all the way around the top.


Pull dark side out through 3 inch hole.  


Sew the 3 inch hole closed in the lining, barely catching both edges.  


Stuff lining into bag


Press the top flat, gently rolling the inner fabric in just a little.  This will give a more finished look from the outside of the bag. 


With a disappearing pen, mark 3/4" and 1 3/4: away from the top, around the inside of the lining.


Sew along both lines, reinforcing starts and stops, to create casing for cord.


Using a safety pin, thread the cording through the casing.  Tie a not at the end with both cords.


I used some "fray check" to keep my cording from unraveling.


linked up:

Friday, November 6, 2015

varsity checkerboard quilt - give away


I drooled, dreamed, schemed over this online picture of varsity with the rest of you for WHAT SEEMED LIKE AN ETERNITY!  


This mini charm pack was my first virtual sighting.  I couldn't resist.  Before too long and several trips back to an etsy basement store (couldn't even wait for the mail man), I had 6 or 8 of them.


and was furiously sewing away.  This method of checker boarding is so intriguing, but not recommended, it's only for impulse quilters with lots of mini charm packs.


 this method is much faster.


why you ask?  

ETERNAL TRIMMING.

  are you still using your archaic square rotating board?  or have you discovered the matilda's cutting mat?  YES, more than just the earth is round.  learn about it here


to the design wall


"stack and sew method" shown here


 off to the hq sweet 16 for a fast spiral quilting job.


quilt stats:
40 x 50 (washed)
batting - 80/20% comfort blend by winline
fabric  - varsity by sweetwater for Moda
binding  - hometown in gray by sweetwater
quilting - one big circle, organic
pattern - checker board


leftover's GIVEAWAY:   Closed.  Congratulations, Patti.  Your package is on it's way.


I have 100 left-over mini's from this project.  It contains the yellows and blacks from the mini charm pack, as well as others.  If you're interested in them, leave me a comment telling me how many years you've been sewing, and how many years you've been quilting.


linked up:
finish it up friday


Tuesday, November 3, 2015

quilt retreat prep

quilt retreat prep - defined as designing, planning, purchasing, pressing, cutting and organizing as many projects as you can


 so that during your quilt retreat, you can sew without disruption of children, husbands, showering, eating and believe it or not, sleeping.


The world stands still while you furiously sew away in a little bubble with your other crazy quilting friends (until you get home and realize that the world hasn't stopped and you have a bunch of messes to clean up) 

The prep depends on the project.  Projects like "plus quilts" are laid out on the design wall and carefully stacked and made ready for sewing.


Other projects, I make up 1 block (taking lots of notes) and cut the pieces to make the rest of the blocks.


 I'm so excited to use my new flying geese ruler.


 What should I do with this lush grouping?


Happy Wednesday!

linked up:
freshly pieced