
During the mid 1800's, Log Cabin quilts were hung outside to give messages to the slaves traveling the Underground Railroad. The different colors of the center square of the quilt signified signs of "safe houses" or danger.
Be creative with the center square of your block. It will change the look of your quilt.
Stats:
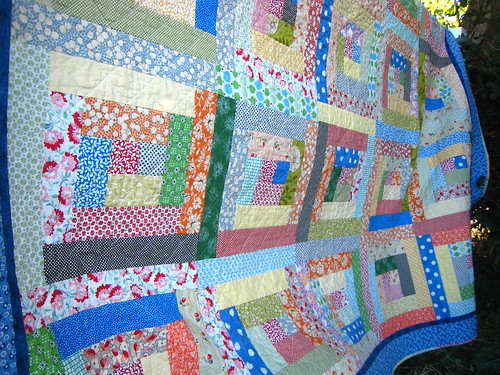
Quilt size - 78 inches square
QUILTING:


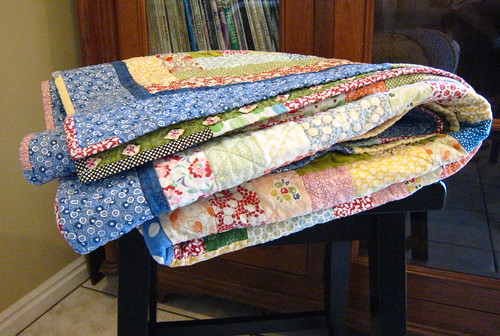
You can use your scraps for the binding. . . they're already cut to 2 1/2 inches and ready to go.
Enjoy checking out all the other quilts:

Stats:
Quilt size - 78 inches square
25 blocks
Finished blocks are 14 inches square
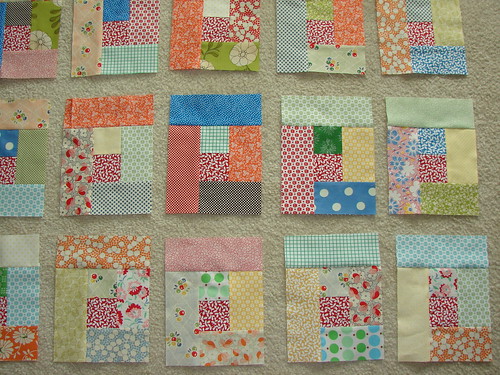
For a true "scrappy log cabin", follow these instructions:
CENTER SQUARE:
Cut 25- 2 1/2 inch squares of the same fabric. Traditionally, red is chosen for the center. These will be your CENTER SQUARES.
Cut 25- 2 1/2 inch squares of the same fabric. Traditionally, red is chosen for the center. These will be your CENTER SQUARES.
Cut 2 1/2 inch strips, of remaining fabrics, selvage to selvage (or use 1 jelly roll for a small quilt, 2 for a larger quilt). The more fabrics you have, the better for a scrappy quilt. This one has 20 different fabrics.
Put your strips of fabric into a big bag and mix them up.
Without looking into the bag (I'll be honest, I peeked), pull a strip out and sew it to a CENTER SQUARE. Since the strips from your bag don't have a fresh cross cut, align your CENTER SQUARE down 1/2 an inch from the top of the strip (3/4 if you are at a selvage), it will be trimmed later.
Continue until all CENTER SQUARES have a second strip sewn to them. Do not trim the long strip you just added until you have finished adding to all the CENTER SQUARES.
Press and trim the second strip so edges match the first CENTER SQUARE. After you've used a strip, put it in a separate pile. When you've used all the strips in your bag, start over.
Now add a 3rd strip to all your squares, being careful to add it in a counter close-wise direction. The diagram above shows the new or longer piece moves in a counter clock-wise direction.
Now add a 3rd strip to all your squares, being careful to add it in a counter close-wise direction. The diagram above shows the new or longer piece moves in a counter clock-wise direction.
Continue until all 25 CENTER SQUARES have 16 strips sewn onto them.
Trim squares to 14 inches.
QUILTING:
Use "Scotch-Blue Painters Tape" when quilting a grid design. Lay one strip down the middle of your quilt and sew 1/8th inch from tape on both sides. Then lift the tape off, and reposition for the next 2 quilting lines. EASY!!
I used the 2 inch Blue Painters tape for this quilt.
You can use your scraps for the binding. . . they're already cut to 2 1/2 inches and ready to go.
Enjoy checking out all the other quilts:
Linda,
ReplyDeleteLove the scrappy log cabin. Great colors.
Carol
I love scrappy, and I love log cabin! Yours is colorful and very pretty! Thanks for the tutorial, too.
ReplyDeleteWhat a wonderful scrappy quilt! Love that strong blue!
ReplyDeleteHazle
Scrappy quilts are always fun for me to make and I love your log cabin scrappy!
ReplyDeleteI love it. I love scrap quilts and log cabin quilts. Your inclusion of a touch of history is great.
ReplyDeleteFun quilt. Thanks for the tutorial.
ReplyDeleteFun pattern! Very clever idea with the painter's tape.
ReplyDeleteI don't believe the slave story, but your log cabin quilt is very nice!
ReplyDeleteI love this quilt! Very nice.
ReplyDeletethis is so gorgeous...thanks for the little tutorial. it looks so beautiful all together and all those colors are amazing.
ReplyDeletethe quilts and underground railroad stuff has been debunked by scholars; but love the scrappy nature of the quilt!
ReplyDeletelove your quilt. great colors and nicely done. thanks for sharing and have a great day
ReplyDeleteLove this quilt!
ReplyDeleteI love it! Can't wait to start mine. Just now finishing up on my first Log Cabin Quilt.
ReplyDeleteI love it too! I have a question though. Do you think separating the strips into light and dark bags would work as well? I just see log cabin quilts with light and dark and there usually are both in collections.
ReplyDelete