Friday, March 29, 2013

binding noteworthy plus

I would love to be binding "noteworthy plus". . .


But with a wedding in the short distance, the yard has been my goal this week:


In case you haven't figured it out, "maidenhair fern" is one of my favorites, you will always find it in my yard.


The weather has been celestial this week and the colors so vibrant.  


Speaking of weddings, I have to share a funny tid-bit.  A shower was thrown for our daughter last week-end.  As part of the game, if the bride answered a question wrong, this is what they did to her:  (tied to helium balloons)


Back to quilting . . .

I can't decide what to bind this quilt with.  I love these 2 fabrics, but my heart says to use the back ground fabric, a disappearing binding.   I'm interested in your opinion . . . 


Linked:


Tuesday, March 19, 2013

wip - quilting noteworthy plus


I've seen these cool circular fmq designs so I decided to research them a bit.  I kept coming across the word "concentric".  Evidently, I missed that day in Algebra or totally spaced it or something.  So, after looking it up, I found that a bulls eye is a concentric circle.  That will be a cool design to try some day when I have the patience to fish all those beginning and ending strings into the quilt.


I'm quilting giant spirals.  I was just winging it, but found that using marking pens helped a lot, especially since I'm quilting this on my regular pfaff with the itty bitty throat space.


 Linked:


Friday, March 15, 2013

noteworthy plus

My finish for the week, noteworthy plus quilt top.


Note to Moms with kids in school:  Don't ever let your teens tell you they won't ever use the math they're learning!  I really need to take a quilt math class . . . or just learn to follow a pattern :0


Linked:

Finish it Friday . . . Thank you AmandaJean!!

Fat Quarter Friday


Friday, March 8, 2013

Raggy Squares baby quilt - tutorial


This is a fun fast project, especially if you use pre-cut squares.

Quilt dimensions:  48" x 48"


Ingredients:


4 mini charm packs (169 - 2.5" squares) **
1 1/4 yds back ground fabric
1 1/4 yds backing fabric
1/2 yd binding fabric
1 yd cotton batting
thread to match your back ground fabric

**When a new line of fabric first comes out, pre-cuts are available before yardage.  Mini charm packs go quickly, so if not available, cut from yardage.


For another set of instructions, go to the DIY Dish.com page.

Instructions:

1.  Baste quilt - Prepare back ground fabric and backing by pressing.  Baste backing fabric, batting and back ground fabric using adhesive spray.


2.  Mark a grid onto your quilt top.


Find the middle.  Place a 2.5" fabric square in the middle (I placed all 13 squares down to get a visual).  This is the beginning of your grid.  Using your water soluble marking pen and a long ruler, mark a vertical line on the right of that first square and continue all the way across the quilt.   Before marking, measure to make sure you are the same distance to the edge all the way across the quilt.  Repeat the same process along the left of the first square.  You should have 2 vertical parallel lines measuring 2.5" apart marked across your quilt top.

I placed my squares 3/4" apart, but I've seen 1/2" and that works as well.  


 Your original 2 lines across your quilt will be 2.5" apart.  Continue marking down the right side, marking 3/4" away from your first vertical line.  Mark 2.5" then 3/4" all the way to the right edge, then down the left side until all the vertical lines on  your quilt top have been marked.


 Your quilt top will look like this:


 Follow the same process to find the center point going in the horizontal direction.  Mark all lines as previously shown.


 3.  Adhere squares onto quilt top.

Work 2 rows at a time.  Adhere using your favorite product.  I used basting spray because it's what I had.  It was a little messy.  I just sprayed a dot in the middle of the squares.


I'm told you can also use an Elmer's fabric glue stick.  Put a dab on each corner, though I haven't tried this myself, and would want to do some research to make sure it didn't gunk up my machine.   


 4.  Sewing squares to quilt top.

Sew one continual line from top to bottom sewing 1/4" from the edge of the squares.


 Hopefully you can change the needle position on your machine:


5.  Bind your quilt.


6.  Wash to fray edges.


You may need to clean out your lint collector in your dryer 1/2 way through the cycle.
Enjoy!


Finished Yield:

48" x 48"

Noteworthy:


Reunion:


Have you ever heard of a "dessert roll"?  It's a roll of 5 inch strips, kind of like a jelly roll.


Check out Sweetwater's newest line . . . "the boo crew".   These little monsters are sooo cute!  I'm not big into making seasonal quilts, but this week I'll be working on creating something with it.


Linked: 

Finish it Friday  -  thank  you AJ!


Friday, March 1, 2013

Friday finishes - working baby shower

Here are some pictures from our "working baby shower last night":


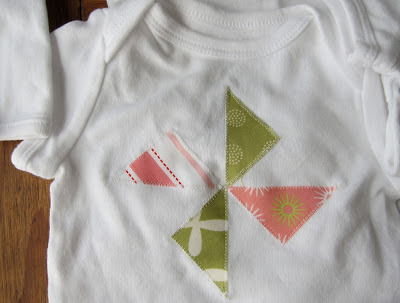
These onesies are so fun to make!  Old Navy makes a good quality onesie.  Gerber comes in second.  Carter's are a bit thinner, which works to your advantage in the hot summer, but the snaps may not last as long.


 We used webbing (double sided interfacing) to attach the fabric down to the onesies.  "Heat and Bond" brand works best (medium), the kind with the paper on the back.  FOLLOW THE DIRECTIONS ON THE PACKAGE.

Cut a piece of webbing slightly larger than the fabric you will cut out.  Place the webbing on the back of your fabric and pass the iron over it twice.  LET IT COOL. (If your iron spends too long on the back of that webbing, it will permanently adhere the paper to your fabric, and you'll have to start over)

Cut to desired shape.  Peel the paper off the back and place webbing side on to your next layer, whether it be a bordering fabric or the onesie.  Below it is a pink border.


Follow the same process as above, cutting your back ground fabric slightly larger than what the finished cutting will be.   Attach another piece of webbing to the back of your back ground fabric, cut to desired shape and iron onto onesie.  Cool.  Zig Zag with thread color matching the fabric.  Play with the zig zag settings on a scrap piece of fabric till you get the size you want.


 It's not going to be perfect.  You're working with 2 kinds of fabric here, one that stretches.  But it WILL BE CUTE!


It was hard to stitch perfectly around those pelts but with a good washing it will fray up.


 Burp rag tutorial here.


"raggy squares quilt" (tutorial to follow next week)


Finish it Friday?  You ask what am I finishing today?  Try putting my house back together from a 30 person party last night . . . my house isn't that big!


Linked:

finish it friday . . . Thank you Amanda Jean!!