Friday, September 30, 2016

jean rag quilt & giveaway

We have a son in college, and he has a new girl friend.  I figured it was a good time to make his jean quilt with his high school jeans.


 I drew up a pattern and started cutting away.


For each square, I cut a front, a back and the batting, which is 1 inch smaller


sandwich batting between a front and a back square


Sew from one corner diagonally to the other corner.
Repeat, forming an x on each square.  Congratulations, you have just quilted that square, and it holds the batting in place.


finished squares sewn together . . .


Our son served a mission for our church in Bolivia and spent several months in a remote village.  He only had 1 pair of jeans with him to wear.  I used 80% of that pair in this quilt


Those jeans have a lot of tender memories, and give the most character for the quilt.


stats and a few important things to remember:
finished:  60 x 70
20 blocks, 15 inches square
It takes 5-7 pairs of jeans (depending on how long the legs are)
use denim needles 90/14
use 4 color catchers in the washing

With traditional rag quilts, you clip the seams every 1/2 inch or so to create the raggy look, but since jeans fray so well, I just wanted the frayed look.  A few washings took care of that.

Note to self:
After jean/flannel quilt is sewn and ready for washing, fold the quilt in 1/2, flannel sides facing each other (fold longer ends together so that your quilt is long, it will spin better in your washer).
Sew around the 3 open edges with a large stitch.  Then wash.  Undo stitching after washing and drying complete.  This will alleviate HOURS of time having to "de-pill" your flannel side (I may or may not have learned that by experience)


The best part of making a raggy quilt is that after you've sewn your blocks together, IT'S DONE!!!  You quilted it along the way.


giveaway:  winner is Tiffany.


How about you?  have you ever made a jean quilt?  do you have any tips to add?  Leave me a comment if you're interested in this giveaway.

linked:
finish it friday
whoop


Monday, September 19, 2016

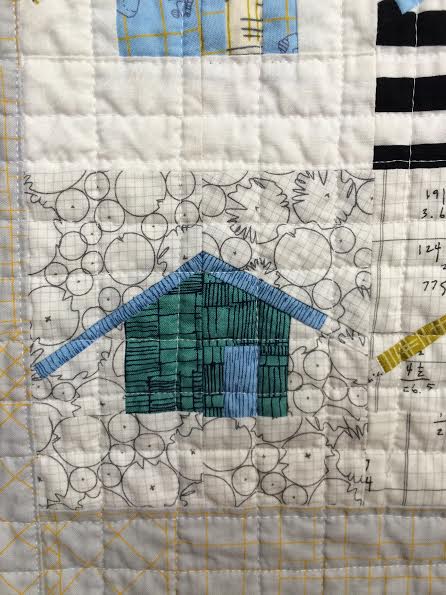
outhouse for blogger's quilt festival

Welcome to the Quilter's Blog Festival hosted by Amy's Creative Side.  I hope you enjoy viewing all the amazing quilts from such talented quilters.

Last fall while at quilt market in Houston, Carolyn Friedlander had this pattern hanging in her booth, and I fell fast!  (don't you love all the pictures coming out of IG after fall market?)

 detailed, yet simple.


I had been collecting my favorites of Carolyn's fabrics (except for that black and white stripped and checked)


I procrastinated starting for a while when I realized that this pattern was that "paper piecing" thing that has been so popular recently.  I'm not really into difficult quilts, or directions for that matter . . .


But a nice friend walked me through it.  These blocks are 5 inches square!!!


 I convinced myself that a wall hanging of 4 houses would be sufficient.  But there were so many fabrics I still wanted to use, so I continued.


 Carolyn was an architect in her previous life, that's what makes her fabric designs so unique.


 Cross Hatch quilting seemed appropriate.


I'm entering this piece in the modern quilt category.  I'm so thankful I became a quilter at the start of the whole modern quilting age, because it just speaks to me!!

Now, I'm excited to see what you've quilted . . .


gardenvale circles for blogger's quilt festival

My internal clock tells me it's time for the Blogger's Quilt Festival.  The festival starts the beginning of the fall quilting events, with market, festival and retreats soon to follow.   I love seeing what my talented blogging friends have been up to.  And as always, a big thanks to Amy for hostessing.

Since this quilt was going to be donated to charity, I found some nice scraps. 


I got this wild vision in the middle of the night with the image of this quilt, and didn't want to wait to find a drunkard's path ruler (they're hard to find), so I used the lid to a pot.  
I was pretty disappointed at first to see that my points weren't matching up (should have waited for the ruler).  But as it started going together, it grew on me . . . you know, the whole "new age movement",  no quilt police here.


 My favorite part of this quilt is the scrappy binding.

It has ended being one of my favorite quilts.  A couple of our adult kids were disappointed when they learned that it was being donated.

I'm linking up to the Scrappy Quilt Category in the blog festival.  I hope you enjoy seeing all the entries.  Don't forget to come back and vote next week!


Saturday, September 3, 2016

value quilt

This value quilt went very fast.  The squares are 8 inches.  It's a great scrap project, even the whites are scraps from my "whites drawer" (it was nice to get rid of those random unlabeled whites).    This was a great option for a charity quilt.


The HST are made by paring a print square with a white square.  With right sides together, draw a line from one corner diagonally to the other corner.  Sew 1/4 inch seam on both sides of the line.  Cut along the drawn line, down the middle of both seams.  You will now have 2 HST.  Open and press.

stats:
68 x 85 washed
val and co fabrics (and a few others thrown in)
cut 8 1/2 inch squares

Design shamelessly copied from Confessions of a serial quilter.

linked:
finish it up Friday